
A few months ago, I decided that it was time for new curtains in the family room. As you may have seen in the welcome post, my family room used to be overwhelmingly orange/tan, and the curtains certainly weren’t helping things. They were at least 10 years old, their liners had numerous tears, and their microsuede fabric was stained and not washable.


So, I began the search for the perfect replacements. I knew I wanted something much lighter in color, and something with a bit of a pattern, but not too busy. I also liked the heavier weight of the old curtains because they helped to keep the heat in in the winter and out in the summer. And, with two dogs, it was very important to be able to easily wash the curtains at home. After a bit of searching, I found these beautiful Cotton Canvas Scroll Medallion Curtains in Smoke Blue from West Elm. I was smitten, but I was worried about how thin the curtains might be.
Since these curtains aren’t lined at all, I figured that I could buy blackout liners to hang behind them, and then they would be just what I wanted. Simple, right? It turns out, it’s not so easy to find white liners that are a) the correct dimensions and b) affordable. I didn’t want to spend more on liners than I did on the curtains themselves.
Long story short, ordering blackout liner fabric and making my own liners seemed to be the best and most cost-effective route. Having removable liners was important for me because I wanted to be able to wash the curtains. I was surprised I didn’t see any other tutorial for removable no-sew curtain liners out there, so I wanted to share my solution!
Materials:
- Curtain liner fabric (I used this blackout liner)
- Medium- to heavy-weight cotton cord (I used this crochet yarn)
- 5/8″ iron-on bonding tape (other widths are available)
- Pin-on drapery hooks
- Velcro sticky-back ovals for fabric
- Optional: A spray-on fabric protectant, such as 303 Fabric Guard
Tools Needed:
- An iron
- An open, flat work area
- A heavy-duty needle
- Straight pins
- Scissors
- A tape measure
- A rag or hand towel
Cost:
Here is a cost breakdown of what I spent on materials for this project:
| Item | Cost Per Item | Total |
| Blackout liner, 10 yards | $3.49/yd | $34.90 |
| Cotton cord, 136 yds | $4.99 | $4.99 |
| Bonding web, 13 yds | $5.42 | $5.42 |
| Drapery hooks, 56/pkg | $4.98 | $4.98 |
| Velcro ovals, 16 sets/pkg, 4 packages | $3.39 | $13.56 |
| Grand Total | $63.85 |
I made liners for 4 curtain panels, so this breaks down to $15.96 per liner!
How-to:
1. Prep work space
You will want an open and flat area for this project. Working on the floor was easiest for me, but you can do it on an ironing board if need be. (If your floors are carpet or hardwood, I would NOT recommend doing this on the floor, as you will be using a hot iron and it will produce lots of steam and condensation.)
Lay your curtain on the floor face up, and spread it out smooth. I put a bed sheet down first to keep the curtain clean. It may seem weird to have the curtain face up, but the curtain may not be perfectly square, so this is the easiest way to assure the shape of the liner matches up properly with the curtain.

Lay your curtain out face up, and then roll the liner fabric out face down over the curtain
2. Measure & cut fabric
Roll the liner fabric out face down over the curtain, and cut it to size. Be sure to leave enough fabric at the top and bottom to make a 1″ hem. If you cut the fabric 2″ wider than the curtain on all sides, you should have plenty to work with.
3. Fold & mark hemline
Beginning with the bottom, start creating your hemline. You will want it to overlap with the hemline on the curtain, but be slightly shorter so it doesn’t show when it hangs. Mark the hemline by pinning straight pins along the fold, but don’t pin the hem closed.

Make your bottom hem about 1″ above the bottom of the curtain
Mark the hemline by pinning straight pins along the fold
Pin the hemline for the top next. Placement may depend a bit on the type of curtain you have, but make sure you overlap the liner hem with the curtain hem by at least 1/2″.
Once you’ve pinned the top and bottom, it’s time to do the sides. You will want to make these hems pretty close to the edge of the curtain – within about 1/4″ or so since you will be adding the Velcro ovals along the sides.
4. Add loops
Now it’s time to add the loops by which you will hang the liner. I know I said this is a no-sew project, but you will need a needle for this step. It’s not really sewing though – I promise! And you only have to do this along the top hem.
Before you start adding loops, you will want to measure out and mark where they will go. The loops at each end should be as close to the edge as possible – about 1/2″ or so. Again, you can use a straight pin to mark the loop placement. It’s best to place the loops approximately every 2″ – 3″ so that the weight of the liner is evenly distributed. My curtains are hidden tab top, so I put a loop on center with each tab, and one centered in between each tab. Each panel has 13 loops.

Start the first loop close to the edge of the curtain
You are going to add the loops straight along the fold of your hem. Grab your needle and cotton cord, and thread as long a piece as you are comfortable working with. Starting on the inside of the hem, push the needle out through the fabric, along the fold, and then back in through the fabric. The loops should be no longer than 1/2″ so they don’t sag when hanging. I used the eye of my needle for reference. As you stitch each loop, you will want to leave a couple of inches of cord at each end so you can tie a knot.

Stitch each loop along the fold of the hem

Leave a couple inches of cord loose at each end so you can tie a knot
Once you’ve stitched all your loops, go back and knot them all as tightly as possible without bunching the fabric. Then trim the ends of the cord.
5. Tape the hems
Now that you’re done adding the loops, you can start taping and ironing the hems. It’s best to do the top and bottom hems before the sides, so that the side hem is nice and clean all the way down.
Before you start, you will want to make sure that your iron has plenty of water, and is nice and hot. Grab a clean rag or towel to use between the iron and the liner fabric, and you might want additional protection underneath your curtain as well. I used a spare piece of cardboard. Take your bonding tape and roll out a length that you can work with. Do not cut it at this point. Place the end of the bonding tape as close the end of the fabric as possible, along the inside of the hem fold, and fold your hem closed.

Roll out a length of bonding tape and place it along the fold of the hem
Place your rag over the hem, and set your hot iron on top. The directions on the bonding tape say to let the iron sit for about 10 seconds while the fabric bonds, but with the thick liner fabric, I found it takes about 30 seconds. Remove your iron and check the bond. If it hasn’t stuck, replace your iron and repeat. Once the first section is bonded, roll out more bonding tape and repeat this process along the length of all four hemlines. Cut the bonding tape at the end of each side. Trim off any excess fabric after everything is bonded.

Place your rag over the hem, and set your hot iron on top

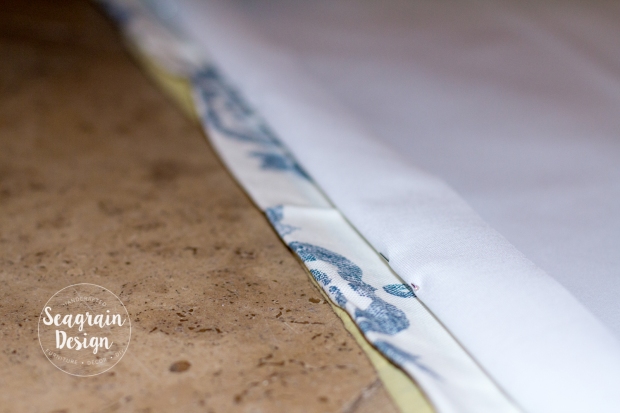
This is how the hem should look when you’re done. If you look closely, you can see the loops along the top.
6. Add Velcro
Once you’ve finished hemming all the way around the liner, it’s time to add the Velcro ovals. The Velcro will keep the sides of the liner attached to the curtain while in use. (You may want to iron your curtain now if it has creases or wrinkles.) **At this point, you will need to flip your curtain face down and your liner face up so that the finished sides are both facing out.** How many ovals you use will be dependent upon the length of your curtains, but I recommend using one every foot or so. You’ll want to space them out evenly so that one is at the top and one is at the bottom on each side. I applied the softer (loop) half of the Velcro to the curtain, and the rougher (hook) half to the liner.

Space the Velcro ovals about 1 foot apart
I found that the easiest way to apply the ovals was to, first, position the liner exactly where you want it on the curtain. Then, peel the backing off of and apply the loop halves onto each side of the curtain panel. Next, leave the backing on the hook pieces, and stick one to its corresponding loop half. Finally, one by one, go around and peel the back off of each hook half and hand press the liner onto the adhesive.
7. Pin on the drapery hooks
You’re almost done! Before you can hang your newly lined curtains, you have to pin on the drapery hooks and hook the loops you added. This is the easiest part. The drapery hooks have a pointy end that just pins right into the curtain, so just go along the top of the curtain and pin one in right where each of your loops are. Make sure that the bottom of the hook ends up level with the loop. Then, go along and hook each loop on.

See how the drapery hooks have a pointy end?

Pin each hook in right above each loop, and slip the loop onto the hook
8. Hang your curtains!
That’s it! Now you can hang your newly lined curtains and enjoy! If you have pets or kids, you may want to spray a fabric protectant on your curtains to help repel liquids and minimize stains.
Whether you have new curtains, or you’re looking to add blackout lining to existing curtains, this is a versatile solution. If you enjoyed this tutorial, please subscribe below for updates and follow along on Instagram and Pinterest. Next week I’ll be sharing an easy DIY for making your own throw pillow cover!
![]()


Sorry if this is a silly question, but why do you need to add the loops/pins when you already have the Velcro? It seems that one or the other would be enough to hold the liner and the curtain together. Thanks for the great tutorial!
LikeLike
The blackout liner I used is pretty heavy, so I was worried that Velcro alone might not hold the liner up on its own, especially since it’s just adhesive-backed Velcro. I used the Velcro more to keep the liner flat against the curtain, so that it wouldn’t look like a separate piece. I’m sure it would work just fine to use only the Velcro if you’re using a lighter-weight liner though! So glad you found the tutorial helpful!
LikeLiked by 1 person